


Screw Hole Filler
Important Information Regarding
Countersunk Screw Fixing and Filling Please note that whilst a high-quality finish can be achieved by countersunk screw fixing and filling Weathergroove Smooth panels, it is important to understand that this will not result in an ‘invisible’ fixing point. Fixing points may become noticeable under certain lighting conditions or viewing angles.
Painting panels with dark colours is likely to accentuate these fixing points, which may also lead to additional movement of construction components. In such cases, filler can shift, becoming visible over time. To achieve the best possible aesthetic finish with Weathergroove Smooth panels, it is critical to ensure the following criteria are met:
Product is installed in accordance with the Weathertex NZ Installation Manual
Weathergroove Smooth panels are kept elevated, dry, and undercover at all times on-site.
Weathergroove Smooth panels are dry at the time of installation
Timber cavity batten must be dry at the time of installation. Failing to do so may result in board movement after the batten dries and shrinks, which can cause the filler to ‘pop’ out.
Screw holes must be prepared and filled as per the instructions on the following page (Screw Hole Filler technical bulletin TB-012 NZ).
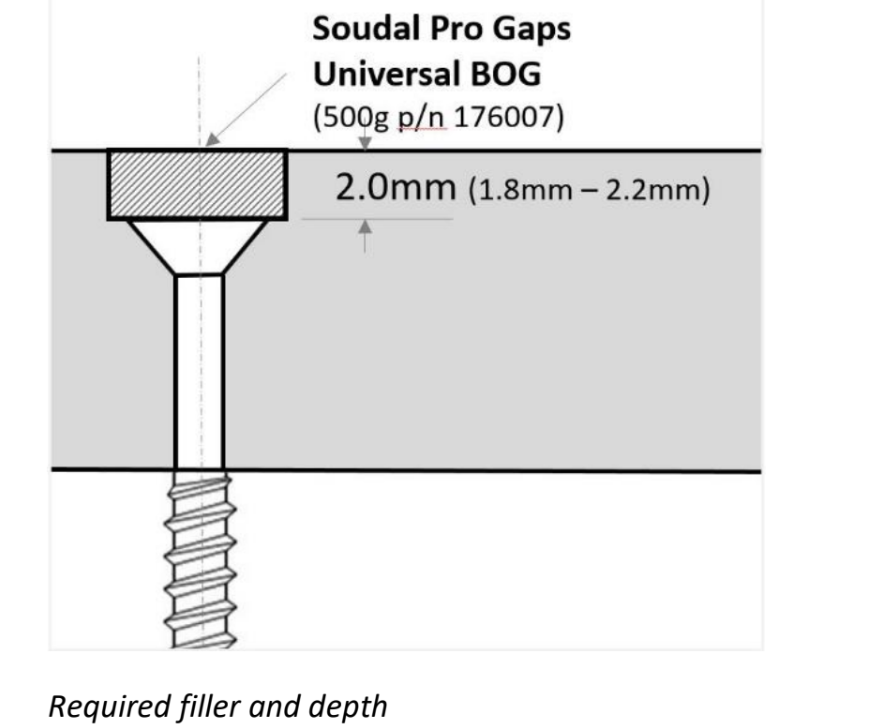
A 2mm screw depth is crucial for ensuring that the filler properly adheres and remains intact.
If visible filler is a concern, it is recommended to use the nail fixing method.
For instructions on preparing and filling screw holes, please refer to the technical bulletin on the
following page.
Weathertex recommends when using the countersunk screw method, screws must be installed using pre-drilled countersunk holes, 2mm below the panel surface, primed, and filled with Soudal Gorilla BOG,
ready for the finishing paint coating.
Countersink tool P&N Quickbit Cutsmart Drill TCT &
Countersink TCT 9/64 (10G) (p/n 107CSC001)
Panel primer Use a high quality water based primer e.g.
ZINSSER® Bulls Eye 1-2-3® Water-Base Primer, Resene
Sureseal, or Dulux 1Step Prep Oil Based Primer, Sealer &
Undercoat.
Filler Soudal Pro Gaps Universal Bog (500g p/n 176007)
Store panels under cover, elevated from the ground, in a dry
and ventilated location.
Panels and Cavity battens must be dry, to minimise board
movement and filler displacement after installation.
Finishing method:
No wetting of the hole by rain during installation
Ensure panels are installed in accordance with Weathertex installation manual
Countersink screw holes to a depth of 2.0mm (1.8-2.2mm)
Pre-prime holes and allow to dry before filling, in accordance with manufacturer’s instruction
Use Soudal Pro Gaps Universal Bog to fill hole
Typically use a painter broad knife to fill flush with the surface of the board
Sand back filler level with the panel with 120 grit paper
If any primer paint is removed (back to raw timber), re prime and allow to dry
Finish with your preferred top coat paint system (LRV 40% and higher), following manufacturer’s instructions
Soudal Pro Gaps Universal BOG is a two-component polyester putty, which should be prepared and installed in
accordance with the manufacturer’s instructions. Also known as Soudal Universal BOG in Australia.

This method of filling the screw hole is not invisible. Dependant on the quality of the finishing paint system and environmental conditions, a circle in the topcoat paint may appear around the filled area. Repair by sanding and reapplying the finish coat system.
Weathertex recommends a decorative nail or a screw fixing when painting with dark paint colours (LRV 40% and lower).
Dark colours lead to additional movement of construction components where filler may be prone to moving and
becoming visible.
Weathertex recommends an exposed fixing pattern with nogs / dwangs at 600 mm centres to create a more visually appealing layout for decorative fixings. (refer to Weathergroove Installation Manual, 2.4.6 Fastening).

Subscribe
Sign up for exclusive Weathertex tips and trends sent straight to your inbox